

Introduction
Configuring MSP Process and HaloPSA to work with one another is a quick and easy process that is composed of a few steps:- Creating an Agent in HaloPSA that has the appropriate roles and permissions.
- Creating an Application within the HaloPSA API
- Providing MSP Process with the appropriate URL and tokens to communicate with HaloPSA.
- Creating a custom tab in HaloPSA that will display the MSP Process Pod
Creating an Agent in HaloPSA
- Sign into your HaloPSA system
- Navigate to Configuration -> Teams and Agents -> Agents
- Click the New button to add a new agent
- Provide a name for the agent; we recommend MSP Process Agent
- Specify a password that meets your organizations security rules
- Assign the agent a Role; we recommend the default Role called 1st Line Support (or your equivalent if you’re modified the Roles in your Halo PSA instance).
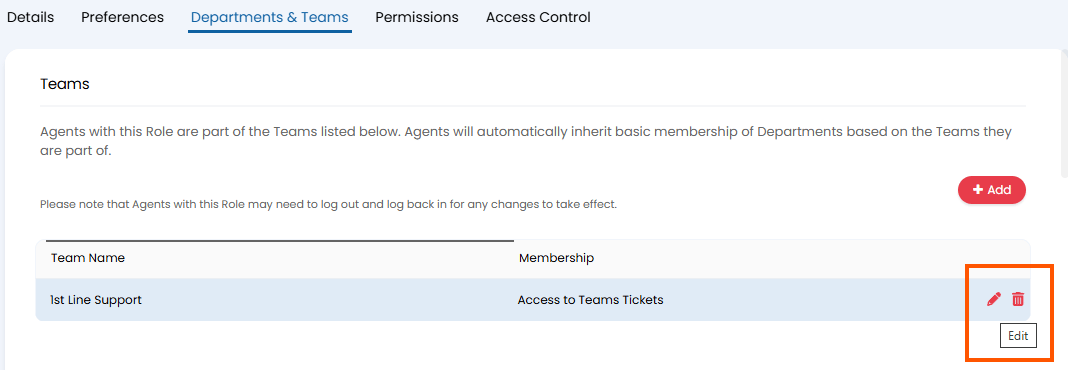
- In the Department & Teams tab, in the Teams section, you will want to edit the Team you are using
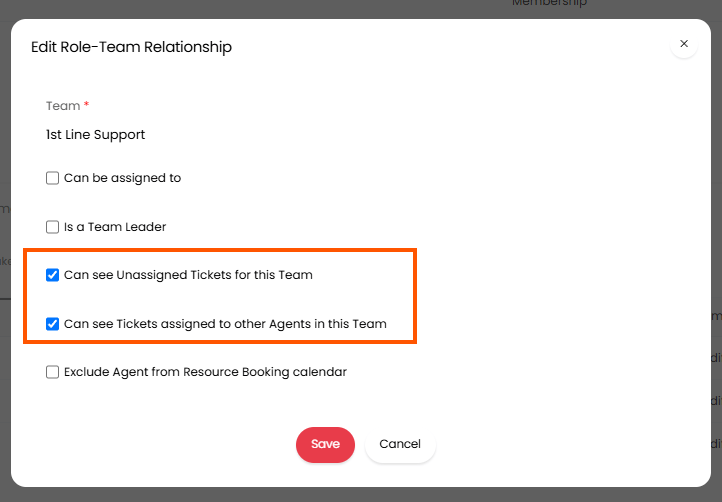
- Once the editing Role-Team Relationship opens, you will want to ensure that the following two options are selected:
- Can see Unassigned Tickets for this Team
- Can see Tickets assigned to other Agents in this Team
- Next you will review the Role permissions. The following Access Level permissions must be assigned:
- Mandatory Permissions:
- Ticket Access Level: Read and Modify
- Customer Access Level: Read and Modify
- User Access Level: Read and Modify
- CRM Access Level: Read-only
- Assets Access Level: Read and Modify
- Optional Permissions - only required if you want to use the MSP Process custom tab within Opportunity, Project or Sales tickets in HaloPSA:
- Sales Access Level: Read and Modify
- Please note that is you are experiencing the errors below, double check these options:
-


- Ticket Permissions
- Can add new tickets: Yes
- Can edit closed tickets: Yes
- Can view unassigned tickets: Yes
- Can view Tickets that are assigned to other Agents: Yes
- Can Re-assign Tickets: Yes
- Editing of Actions: Can Edit Own Actions Only
- Can Edit Tickets Which Are Not Assigned To Them: Yes
- Enable the Is an API-only agent option
- Fill out any other mandatory fields (such as the Team and Working Hours fields)
- Click Save
Agent Permissions
Next, navigate to Configurations > Teams and Agents \> Agents- Edit the MSP Process Agent account; on the Permissions tab, enable the “Can Delete Tickets” option:`
- Click Save
Creating an Application within the HaloPSA API
- From the Halo PSA UI, navigate to Configuration -> Integrations -> HaloPSA API
- Take note of the Resource Server URL; you’ll need it (including the https:// prefix, but without the /api at the end) during one of the configuration steps with MSP Process
- Within the Applications portion of the page, click the View Applications button
- Click the New button to add a new application
- Specify a name for the application; we recommend MSP Process
- Within the Authorization Method section, click Client ID and Secret (Services)
- Copy the ClientID and Client Secret; you’ll need it during one of the configuration steps with MSP Process
- Ensure that the Login Type drop-down menu is set to Agent
- Open the Agent to log in as drop-down menu, and choose the Agent you configured in the Creating an Agent in HaloPSA section
- Click the Save button
- Dismiss any permissions-related messages that appear; we’ll be configuring those next
Configuring Permissions
- On the Permissions tab, click the Edit button and enable the following permissions:
- Mandatory Permissions:
- read:tickets
- edit:tickets
- read:customers
- edit:customers
- read:crm
- edit:crm
- read:items
- edit:items
- Optional Permissions - only required if you want to use the MSP Process custom tab within Opportunity, Project or Sales tickets in HaloPSA:
- edit:projects
- edit:sales
- Please note that is you are experiencing the errors below, double check these options:
- Click the Save button
Providing MSP Process with the appropriate URL and tokens to communicate with HaloPSA
- Login to the MSP Process UI (https://app.mspprocess.com)
- Navigate to Settings -> Integrations -> PSA Integrations
- Click on the Add new PSA icon
- Click the HaloPSA icon
- Specify the ClientID and Secret that you obtained in step 7 of the Creating an Application within the HaloPSA API section
- Specify the Resource Server URL (remove the /api at the end) that you obtained in step 2 of the Creating an Application within the HaloPSA API section. Note that the URL must start with https://
- Click Submit to save the HaloPSA configuration settings
- Finally, fill in the ticketing default fields; these values will be used when leveraging MSP Process to create tickets
- Click Submit to finish setting up the HaloPSA module in MSP Process