

Overview
Escalation Rules make sure a critical alert reaches an on-shift technician when an Alert is created in MSP Process, and goes through a series of escalation steps to alert those on-shift to take ownership, stopping when someone takes ownership or when the last step has fired. This article shows an administrator how to build an escalation rule and how it connects to notification groups and on-call schedules.
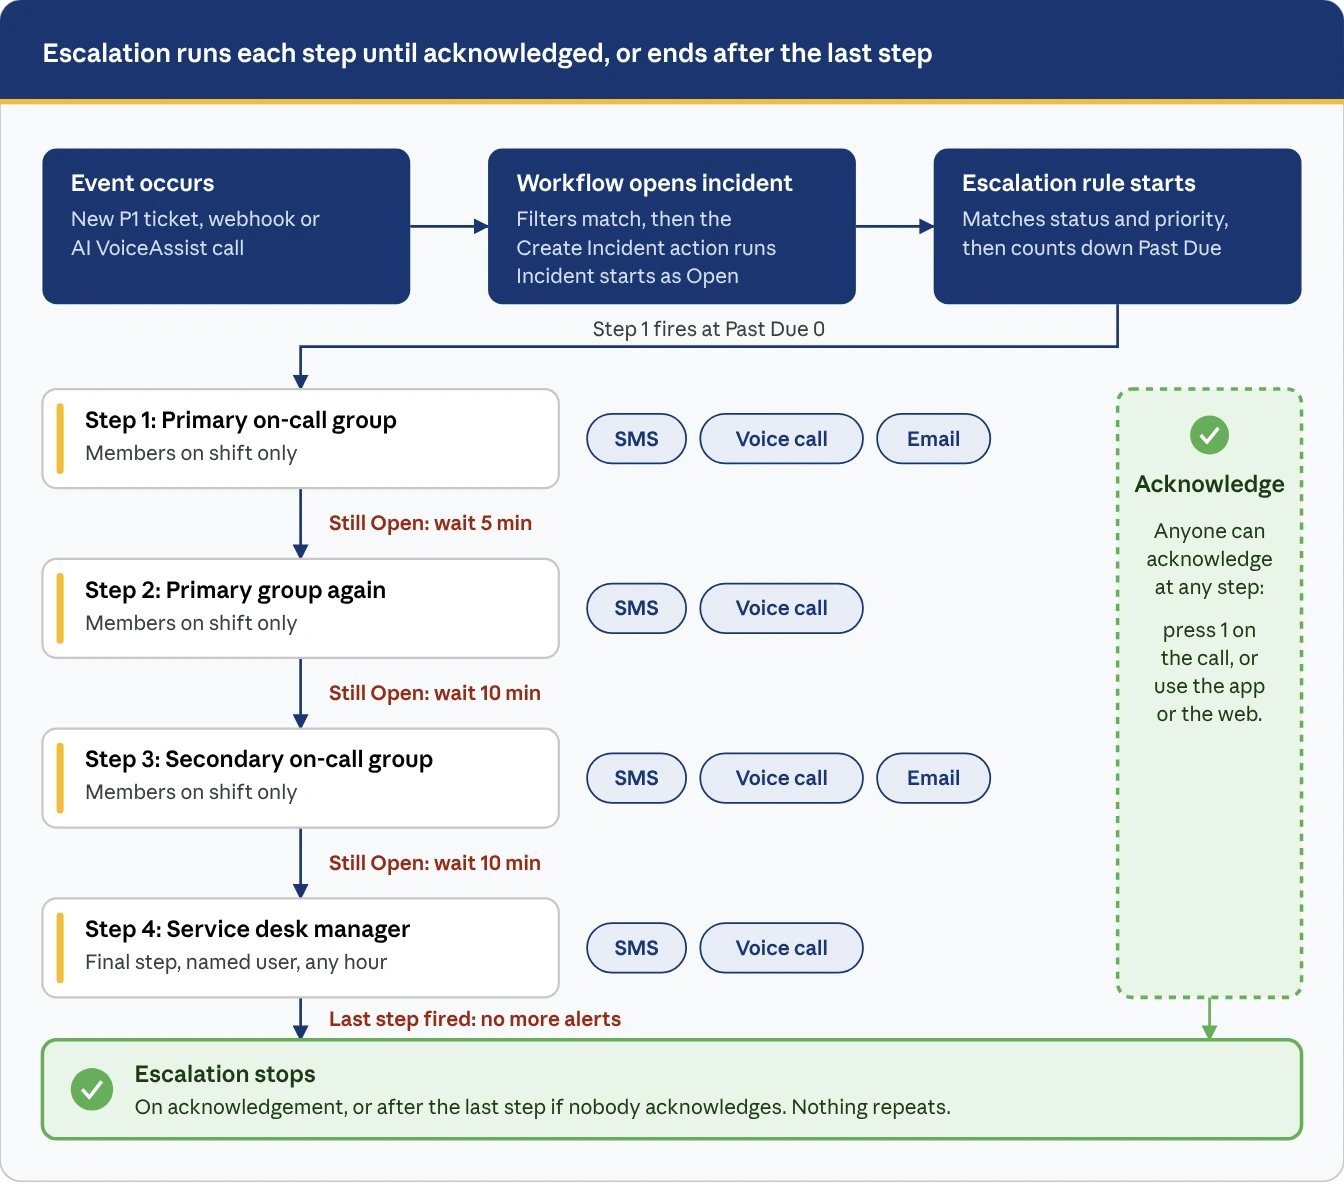
When an incident opens, the escalation rule notifies a group. Only members who are on shift at that moment are contacted. If nobody acknowledges the incident, the rule waits and then notifies the next group or person. Acknowledging the incident stops the escalation. If nobody does, the escalation ends after the last step. It does not keep firing or start over, so make the last step someone who will act.
Prerequisites
Check these before you start. Create your notification groups and on-call schedules first, as a rule can only notify groups with the Notification Groups and On-Call Schedule in place.- Plan: On-call features are included with the Pro plan.
- Incidents module: The Incidents menu appears only when the module is enabled for your account.
- If you do not see this module, please contact Support.
- Role: You need an Admin-level user to create or edit escalation rules.
- Notification Group: who will be notified that belong to a specific group.
- On-Call Schedule: will determine who is on-shift to notify.
- Phone numbers: Keep technician mobile numbers current in your PSA (ConnectWise, Autotask, HaloPSA or another integration) and make sure the PSA integration is connected.
- A user with no mobile number receives email only, never SMS or voice calls.
- An event source: A PSA integration, webhook, email mailbox, App Bot or AI VoiceAssist agent that produces the events you want to page on.
- A list of who covers what: Know your escalation levels (for example primary, secondary, manager) and your shift pattern before you start.
How to set up an escalation rule
An escalation rule decides who is notified, how, and when, after an incident opens. It is where an incident meets your notification groups and schedules.Step 1: Create the workflow that opens incidents
- Go to Monitor & Notify → Workflows and create or edit a workflow.
- Choose the event source and add filters so only the events you want to page on match.
- Add the action Create Incident. Set a subject, a body, a priority and an identifier such as the PSA ticket ID. Add a tag if you route by team, region or time of day.
- Leave Assignment blank. The escalation rule notifies whoever is on call, and the person who acknowledges the incident takes ownership.
- To close incidents automatically, add a second workflow that fires when the PSA ticket closes, with the action Close Existing Incident matching on the same ticket ID.
Step 2: Create the rule
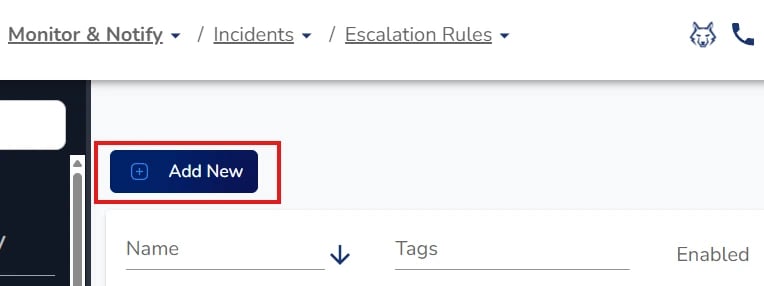
- Go to Monitor & Notify → Incidents → Escalation Rules and click + Add New.
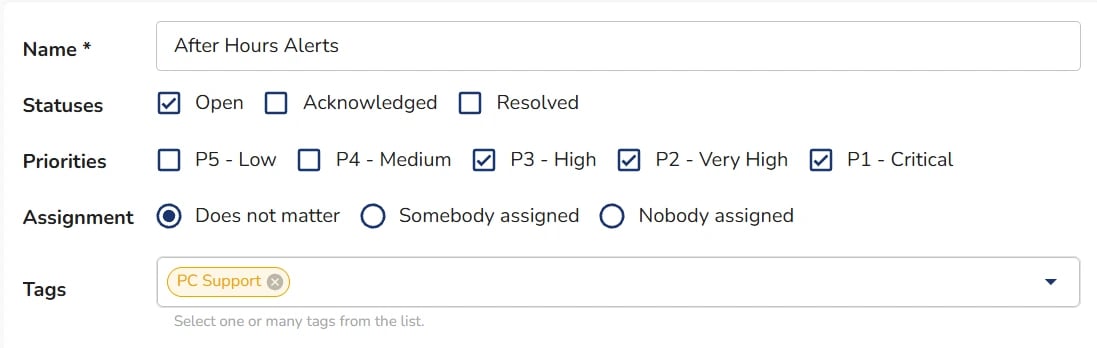
- Name it for the situation it covers, for example After-hours P1.
- Set the conditions: the incident status (normally Open only, so the rule stops once someone acknowledges).
- Priorities: tick one or more from P5 to P1
- For example P1 Critical, P2 Very High and P3 High.
- Set Assignment and Tags
- Assignment: Choose Does not matter, Somebody assigned or Nobody assigned.
- Acknowledging an incident assigns it to the person who acknowledged, so Nobody assigned limits the rule to incidents no one has picked up yet.
- Does not matter applies the rule whether or not someone owns the incident.
- Tags: Select one or more tags in the multi-select.
- Tags are optional labels, such as West Coast and East Coast, or a time window such as 5 PM to 9 PM.
- Add the tag in the workflow’s Create Incident action, then select the same tag on the rule, so only that rule fires for those incidents.
- TIP: Create one rule per tag when different teams or hours need different groups or timing. If one rule covers everyone, leave Tags empty.
Step 3: Set Past Due and choose who is notified first
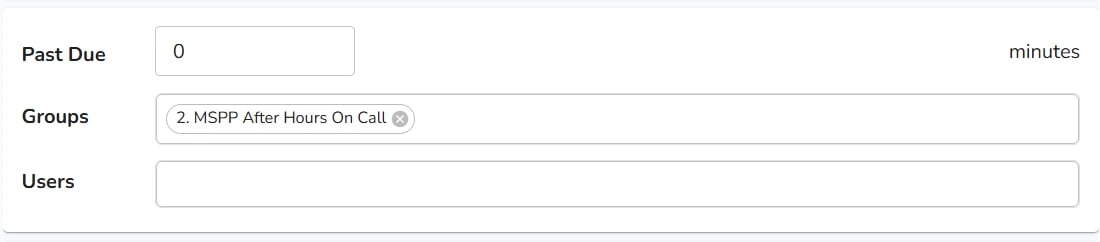
- Set Past Due (in minutes) to 0 so the first notification goes out as soon as the incident opens. Any other value delays the first alert by that many minutes.
- For the first step, choose one or more Groups and, if needed, named Users. A group follows its on-call schedule, so only members on shift are contacted. A named user is contacted at any hour.
Step 4: Choose how people are notified
- Turn on the channels you want: SMS, Voice, Email and Push Notification.
- Each channel has its own message settings, and all enabled channels fire at the same moment.
- Voice has an ID as digits option, which reads the larger numbers out digit by digit.
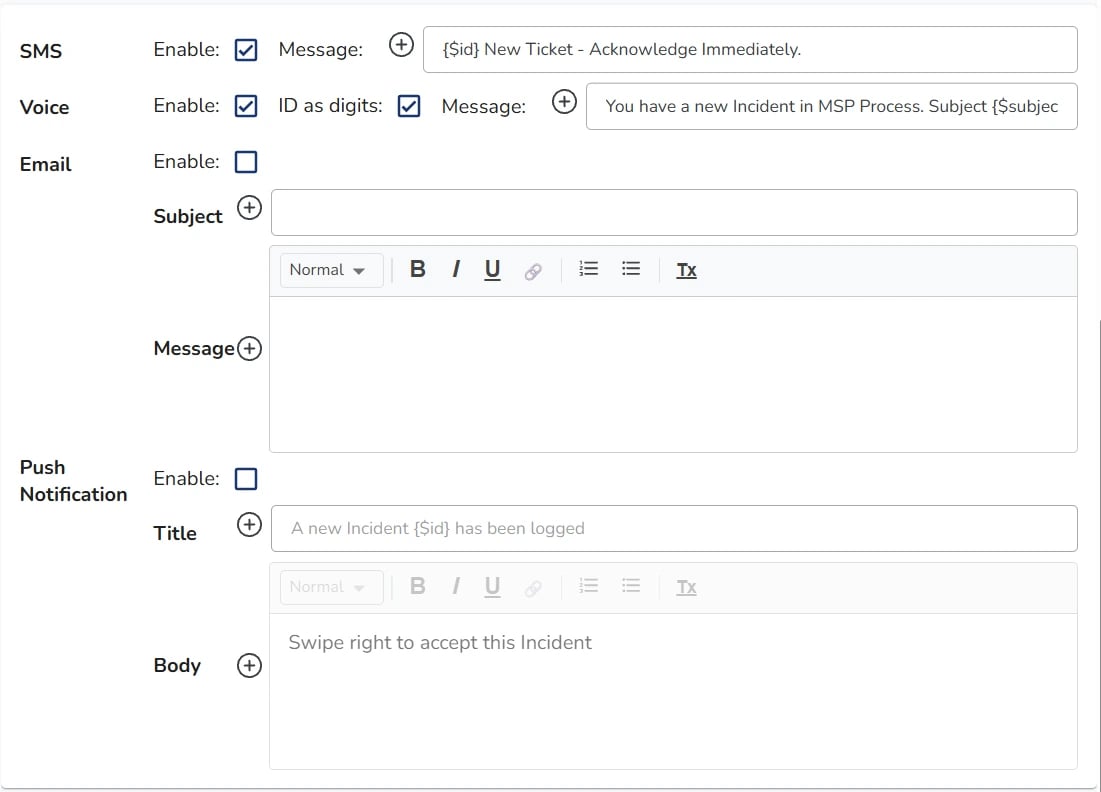
Step 5: Write the message
Each channel has its own message:- SMS and Voice have a message
- Email has a Subject and a formatted message
- Push Notification has a Title and Body
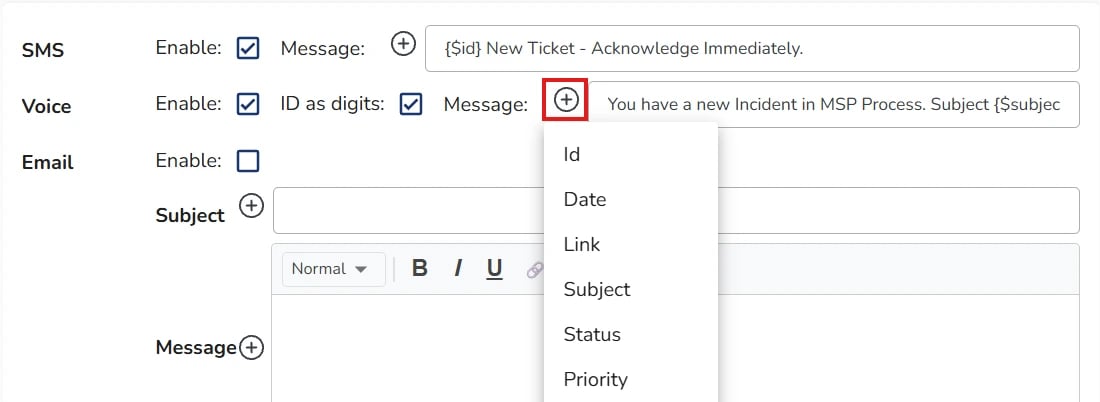
Step 6: Add additional escalations
- Under Additional Escalation, add a row for each further step in the escalation path.
- Enter the minutes to wait.
- Each delay counts from the previous step.
- Choose the group and/or user to notify.
- Use the delete button on a row to remove it.
- End the path with someone who must act, such as a manager added as a named user.
- The last row is the final notification. After it fires the rule stops, even if nobody has acknowledged the incident.
Step 7: Test the rule
- Create a test event that matches the workflow while the person you expect to be paged is on shift.
- Confirm the incident appears under Monitor & Notify → Incidents → Alerts with status Open.
- Confirm the on-shift member receives every channel you selected, and that off-shift members receive nothing.
- Leave it unacknowledged and confirm the next step fires after its delay.
- Acknowledge the incident and confirm no more steps fire.
- Close the test ticket and confirm the incident closes.
How Notification Groups and on-call schedules fit in
An escalation rule does not store phone numbers or shifts. It points at notification groups, and each group’s on-call schedule decides who in that group is contacted at the moment a step fires. Set each piece up in its own article, then connect them through the rule.What happens when a step fires
- The step’s delay ends and the rule looks up the group named in that step.
- The group’s on-call schedule is checked for the current time.
- Each on-shift member is contacted on the channels turned on for them.
- Members who are off shift are not contacted.
- If the incident is still Open when the next delay ends, the next step runs the same way. After the last step, the rule stops.
Check the connection before going live
- Every group in the rule has members.
- Each member has a mobile number and SMS, email and voice turned on, or they receive email only.
- The schedule has no gaps.
- If nobody in a group is on shift when a step fires, nobody in that group is contacted. Add a later step that notifies a named user, such as a manager, so the incident is never left unattended.
- Each escalation level has its own schedule.
- A secondary group with no schedule will not notify anyone.
- Time zones match.
- Check the schedule’s time zone against the team that works it.
- Contact changes are made in the group.
- A member is a copy of the source user, so update them in the group after a number or email changes.
Next steps
- Share the daily-use article with your technicians so they know how to acknowledge an incident.
- Check notification group information and notification methods available.
- Run the test in Step 5 again outside business hours and across a shift handoff.
- Add a second workflow and rule for each other event type or region you want covered.
- Review the escalation logs after the first real incident and adjust delays if needed.
Pitfalls
Past Due left above 0- The first alert is delayed by that many minutes. Set it to 0 for immediate paging.
- Escalation rules only act on incidents. Without the action in the workflow, nobody is paged and the mobile app shows nothing.
- If the workflow matches every after-hours ticket, on-call staff get paged for routine work. Add status, source and title filters before you turn on incident creation.
- One broad rule catches every Open incident of that priority across regions and clients. Create separate rules where the audience differs.
- If nobody in a group is on shift when a step fires, nobody in that group is contacted. Add a later step that notifies a named user.
- A person added directly to a step is notified at any hour. Use a group when you want shifts respected.
- Members with no mobile number receive email only. Check each group against the Notification Groups article.
- Review the On-Call Schedule Using The On-call Schedule Wizard: Admin Setup for more information.
Troubleshooting common issues
Nobody was notified- Open Monitor & Notify → Incidents → Alerts and confirm an incident exists. If it does not, the workflow is missing the Create Incident action or its filters do not match.
- Confirm the incident is Open and its priority matches the escalation rule.
- Open the group’s schedule and confirm someone has an active shift at that time.
- Confirm the member has a mobile number and SMS, email and voice turned on.
- Open the escalation rule and check Past Due. Set it to 0 for immediate notification.
- Check the delay on each later step.
- Allow up to a minute for the workflow to pick up the event.
- Confirm the member’s phone number is correct and that automatic voice calls are turned on.
- Try another phone or carrier to rule out a carrier block on the sending number.
- Confirm the texts or calls are not being blocked as spam on the user’s device.
- Open the workflow and tighten its filters, for example status, source and title text.
- Turn off the Create Incident action until the filters are correct.
- If your PSA can tag on-call tickets, filter on that tag.
- Open the escalation log for the incident and note which rule fired and which group it used.
- Make sure each region or client has its own rule, group and schedule.
- Put the region in the incident subject so it is visible to everyone.
- Confirm the workflow uses the Create Incident action. The app lists only incidents a workflow created.
- Confirm the technician had the app downloaded and has signed in with the same account as their MSP Process account.
- Confirm a second workflow exists that fires when the ticket closes.
- Confirm its action is Close Existing Incident and that it matches on the same ticket ID.
Reach out to support
If you have worked through the troubleshooting steps and incidents still do not reach the right people, contact MSP Process Support through your usual support channel. Please include the following so we can review your request thoroughly:- The incident ID or ticket ID, and the date and time it was created, with your time zone.
- The name of the workflow, escalation rule, notification group and schedule involved.
- Who you expected to be notified, and who was or was not.
- Which channels failed (SMS, voice, email or Teams).
- Screenshots of the escalation rule and the schedule calendar for that time.